Tag: RavenDB Tutorial

RavenDB – Exporting and Importing using Smuggler

badge1Smuggler is a tool for RavenDB which is used for exporting and importing data – today at work I was shown a nice way to use it to take production data out and import it locally for just one collection of documents – something which might be useful and I know I will forget the syntax I the future for so blogging about it helps me know remember it and I can always read here again in the future if and more likely when I do forget it.

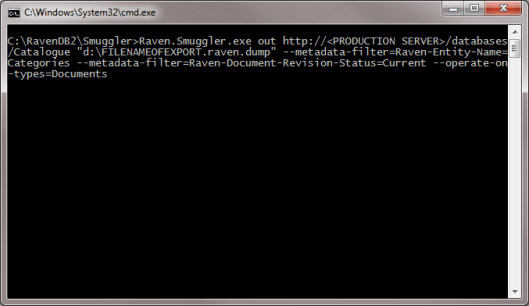
The syntax for exporting a collection called Categories would be as follows:-

smuggler

What are we doing here, well we are saying use Smuggler to export from the Catalogue Tenants database a dump file – we are also using metadata so that we are only exporting a collection of documents called Categories and then only the latest version so no revisions, and lastly only export the Documents so no Indexes or any other types of documents.

I wanted to then import this into my local instance of RavenDB so the following command does just that:-

smuggler2

This will import the Categories and override any existing Categories in my local RavenDB instance.

You can read more about smuggler here.

Hope someone finds that useful.


What I learned last week – July 30 – 3rd August

This week I have been busy watching the KnockoutJS videos on Pluralsight, my favourite way to learn a new technology other than sitting coding – I am also working on a little home-brew website and this set of learning videos has been very handy.

What I learned this past week

  • Visual Studio 2012 will be out August 15th for MSDN subscribers.
  • RavenDB has some very cool bundles and this week I looked at the uniqueconstraint bundle – more here.
  • RavenDB has an updated client Nuget package that allows it to work with an MVC 4 application, before this release the RavenDB client package had a conflict in the version of NewtonSoft.JSon used – this is fixed in the latest stable release.
  • Countersoft have releases a beta of Gemini 5 -if you’re not familiar with Gemini its simple, it’s the best issue tracker software on the web today bar none.

Gemini

Please leave a comment after the beep.


RavenDB – using the uniqueconstraint bundle

During the week at work we came across an issue where we are doing a linq query which is using a statement such as this:-
[sourcecode language=”csharp”] var product = session.Query().Single(GetSource(key));
[/sourcecode]

In Sql Server land we have a product table and the field productcode is unique – we noticed that in RavenDB we were seeing products
which had the same productcode in different documents (not unique), this was not the desired outcome and so we looked into how to go about fixing this in RavenDB, enter the uniqueconstraints RavenDB bundle.

RavendDB bundles are like add-ons and Raven comes with quite a few and they can be exceptionally handy. To use the uniqueconstraints bundle you create a folder and call it plugins, usually you keep this inside the server folder but you can put it anywhere and add a config value so that Raven can find your plugins, an example of how to set up your config to locate plugins:-

[sourcecode language=”xml”] <?xml version="1.0" encoding="utf-8" ?>
<configuration>
<appSettings>
<add key="Raven/Port" value="*"/>
<add key="Raven/DataDir" value="c:\RavenDB\Data"/>
<add key="Raven/IndexStoragePath" value="c:\RavenDB\Data\Indexes" />
<add key="Raven/Esent/LogsPath" value="c:\RavenDB\Data\Logs" />
<add key="Raven/PluginsDirectory" value="c:\RavenDB\Plugins"/>
<add key="Raven/AnonymousAccess" value="All"/>
<add key="Raven/ResetIndexOnUncleanShutdown" value="true"/>
</appSettings>
<runtime>
<loadFromRemoteSources enabled="true"/>
<assemblyBinding xmlns="urn:schemas-microsoft-com:asm.v1">
<probing privatePath="Analyzers"/>
</assemblyBinding>
</runtime>
</configuration>
[/sourcecode]

Server side checking

  • To to use the uniqeconstraints bundle add the Raven.Bundles.UniqueConstraints.dll from the bundles folder to your plugins folder where ever you decide to put them.
  • Then restart RavenDB
  • To see if they have been installed and picked up – go to the Raven Management Studio and then at the bottom left hand side, click on statistics – next to where it says Triggers it should say something like Raven.Bundles.UniqueConstraints.UniqueConstraintsDeleteTrigger

Client Side checking

In order to implement the check through code we borrowed the example written by Richard Dingwall taken from his blog.

[sourcecode language=”csharp”] namespace WhateverNameSpaceYouHave.Extensions.RavenUniqueConstraint
{
using System;
using System.Linq.Expressions;

using Raven.Client;

public interface IRavenUniqueInserter
{
void StoreUnique(IDocumentSession session, T entity, Expression<Func<T, UTunique>>; keyProperty);
}
}
[/sourcecode]

Aboove the interface, below that code that uses it:-

[sourcecode language=”csharp”] namespace WhateverNameSpaceYouHave.Extensions.RavenUniqueConstraint
{
using System;
using System.Linq.Expressions;

using Raven.Abstractions.Exceptions;
using Raven.Client;

public class RavenUniqueInserter : IRavenUniqueInserter
{
public void StoreUnique(IDocumentSession session, T entity, Expression<Func<T, Tunique>> keyProperty)
{
if (session == null)
{
throw new ArgumentNullException("session");
}

if (keyProperty == null)
{
throw new ArgumentNullException("keyProperty");
}

if (entity == null)
{
throw new ArgumentNullException("entity");
}

var key = keyProperty.Compile().Invoke(entity).ToString();

var constraint = new UniqueConstraint { Type = typeof(T).Name, Key = key };

DoStore(session, entity, constraint);
}

private static void DoStore(IDocumentSession session, T entity, UniqueConstraint constraint)
{
var previousSetting = session.Advanced.UseOptimisticConcurrency;

try
{
session.Advanced.UseOptimisticConcurrency = true;
session.Store(constraint, string.Format("UniqueConstraints/{0}/{1}", constraint.Type, constraint.Key));
session.Store(entity);
session.SaveChanges();
}
catch (ConcurrencyException)
{
// rollback changes so we can keep using the session
session.Advanced.Evict(entity);
session.Advanced.Evict(constraint);
throw;
}
finally
{
session.Advanced.UseOptimisticConcurrency = previousSetting;
}
}
}
}
[/sourcecode]

How to call it from code
[sourcecode language=”csharp”] try
{
new RavenUniqueInserter().StoreUnique(session, destination, x =&gt; x.Code);
LogManager.GetCurrent().Event(LoggingLevel.Info, "Inserting Product:+" + destination.Code, "Method name here");
}
catch (ConcurrencyException)
{
LogManager.GetCurrent().Event(
LoggingLevel.Error,
"Product code already in use. Code: " + destination.Code, "Method name here");
}
[/sourcecode]

And thats it, now we wont be able to add a product with a productcode which already exists in our RavenDB database, making it a unique constraint just as youd have in Sql.

Please add a comment or ask a question if you found this useful.


RavenDB CRUD – How To

I always wondered how easy it would be to do a RavenDB CRUD (Create, Read, Update, Delete) example, so lets create a simple MVC application which we can use to create, read, update and delete.

The following is some very basic code and yes you guessed it not for production but more of a quick sample to get you on your way with RavenDB and adding, editing and deleting documents.

We shall use a product model as our basis for the demo application – let’s get started.

  1. Create a blank MVC solution to begin with
  2. Using Nuget add in the Nuget package called RavenDB
  3. Lets setup RavenDB as we require within the global.asax.cs file as below:-
    [sourcecode language=”csharp”] protected void Application_Start()
    {
    AreaRegistration.RegisterAllAreas();

    RegisterGlobalFilters(GlobalFilters.Filters);
    RegisterRoutes(RouteTable.Routes);

    Store = new DocumentStore { ConnectionStringName = "RavenDB", DefaultDatabase = "Products" };
    Store.Initialize();
    }
    [/sourcecode] Note:- I have added in a DefaultDatabase config value above which means I have created a new Products Raven Database within the RavenDB Management Studio called Products, if you don’t do this and just want to use the default database then remove the part DefaultDatabase = “Products”

  4. Add a class into the Models folder called Product as below:-
    [sourcecode language=”csharp”] public class Product
    {
    public string Id { get; set; }
    public string CategoryId { get; set; }
    public string SupplierId { get; set; }
    public string Name { get; set; }
    public string Code { get; set; }
    public decimal StandardCost { get; set; }
    public decimal ListPrice { get; set; }
    public int UnitsOnStock { get; set; }
    public int UnitsOnOrder { get; set; }
    public bool Discontinued { get; set; }
    }
    [/sourcecode]
  5. Now that we have our Model, let’s go ahead and add in a couple of controllers. We will use a base controller when working with our RavenDB project so firstly create a RavenDB Controller, to do this right-click on controllers folder and then select Add then choose Controller, select Empty Controller.
  6. Paste this code into your RavenController:-
    [sourcecode language=”csharp”] public class RavenController : Controller
    {
    public IDocumentSession _session { get; private set; }

    public const int DefaultPage = 1;
    public const int PageSize = 10;

    protected override void OnActionExecuting(ActionExecutingContext filterContext)
    {
    if (filterContext.IsChildAction)
    return;
    _session = MvcApplication.Store.OpenSession();
    base.OnActionExecuting(filterContext);
    }

    protected override void OnActionExecuted(ActionExecutedContext filterContext)
    {
    if (filterContext.IsChildAction)
    return;

    using (_session)
    {
    if (filterContext.Exception != null)
    return;

    if (_session != null)
    _session.SaveChanges();
    }
    }

    protected int CurrentPage
    {
    get
    {
    var s = Request.QueryString["page"];
    int result;
    if (int.TryParse(s, out result))
    return Math.Max(DefaultPage, result);
    return DefaultPage;
    }
    }
    }
    [/sourcecode]

  7. Lets now add a ProductController and this time choose, Controller with empty read/write actions as below:-
    ProductController
  8. We will start off by adding in some code which I have already written for the methods which we will use on the Products Controller, add them into your code:-
    [sourcecode language=”csharp”] public class ProductController : RavenController
    {
    //
    // GET: /Product/

    public ActionResult Index()
    {
    var model = _session.Query<Product>()
    .Paging(CurrentPage, DefaultPage, PageSize)
    .ToList();

    Mapper.Map<List<Product>, List<ProductViewModel>>(model);

    return View(model);
    }

    //
    // GET: /Product/Details/5

    public ActionResult Details(string id)
    {
    var model = _session.Load<Product>(id);
    return View(model);
    }

    //
    // GET: /Product/Create

    public ActionResult Create()
    {
    var model = new Product();
    return View(model);
    }

    //
    // POST: /Product/Create

    [HttpPost] public ActionResult Create(Product product)
    {
    try
    {
    _session.Store(product);
    return RedirectToAction("Index");
    }
    catch
    {
    return View();
    }
    }

    //
    // GET: /Product/Edit/5

    public ActionResult Edit(string id)
    {
    var model = _session.Load<Product>(id);
    return View(model);
    }

    //
    // POST: /Product/Edit/5

    [HttpPost] public ActionResult Edit(Product product)
    {
    try
    {
    _session.Store(product);
    return RedirectToAction("Index");
    }
    catch
    {
    return View();
    }
    }

    //
    // GET: /Product/Delete/5

    public ActionResult Delete(string id)
    {
    var model = _session.Load<Product>(id);
    return View(model);
    }

    //
    // POST: /Product/Delete/5

    [HttpPost, ActionName("Delete")] public ActionResult DeleteConfirmed(string id)
    {
    try
    {
    _session.Advanced.DatabaseCommands.Delete(id, null);
    return RedirectToAction("Index");
    }
    catch
    {
    return View();
    }
    }

    public ActionResult StoreSomeProductInDatabase()
    {
    var product = new Product
    {
    Name = "Product Name",
    CategoryId = "category/1024",
    SupplierId = "supplier/16",
    Code = "H11050",
    StandardCost = 250,
    ListPrice = 189
    };

    _session.Store(product);
    _session.SaveChanges();

    //return Content(product.Id);
    return RedirectToAction("Index");
    }

    public ActionResult InsertSomeMoreProducts()
    {
    for (int i = 0; i < 50; i++)
    {
    var product = new Product
    {
    Name = "Product Name " + i,
    CategoryId = "category/1024",
    SupplierId = "supplier/16",
    Code = "H11050" + i,
    StandardCost = 250 + (i*10),
    ListPrice = 189 + (i*10),
    };
    _session.Store(product);
    }

    _session.SaveChanges();

    //return Content("Products successfully created");
    return RedirectToAction("Index");
    }

    public ActionResult GetProduct(int id)
    {
    Product product = _session.Load<Product>(id);
    return Content(product.Name);
    }

    public ActionResult LoadAndUpdateProduct()
    {
    Product product = _session.Load<Product>("products/5");
    product.ListPrice -= 10;
    _session.SaveChanges();
    return Content("Product 5 successfully updated");
    }

    public ActionResult DeleteProduct(int id)
    {
    Product product = _session.Load<Product>(id);
    if (product == null)
    return HttpNotFound("Product {0} does not exist");
    _session.Delete(product);
    _session.SaveChanges();
    return Content(string.Format("Product {0} successfully deleted", id));
    }

    /// <summary>
    /// Get all the products that are available for sale (discontinued equal to false) ordered by the product’s list price
    /// </summary>
    /// <returns></returns>
    public ActionResult GetDiscontinuedProducts()
    {
    var products = from product in _session.Query<Product>()
    where product.Discontinued == false
    orderby product.ListPrice
    select product;

    return View(products.ToList());
    }
    }
    [/sourcecode]

  9. Ok so above we added a lot of code but this is good as this is the entire product controller and will allow us to add/edit/delete new products into RavenDB.
  10. I also added in a couple of methods for creating some test data, and also a method for returning discontinued products, mainly to show how you can go about doing this.
  11. Some screen shots are below, note they show me using RavenDB Profiler and MiniProfiler:-

    Crud 1

    Crud 2

    Crud 3

The code for this article is up on github here.
For more on RavenDB have a look at my other RavenDB posts here.

Please leave a comment, ask a question, find a bug or anything like that please let me know.


Exporting and Importing data with RavenDB

I was wondering how I would go above upgrading from one build version of RavenDB (build 701) to a newer version of RavenDB (build 888) and decided to find out how.

As it turns out like most things in RavenDB its very easy! – the following is how to go about upgrading from one version of RavenDB to another.

Note:- You can do it this way and this is the recomended way here however I wanted to try doing it using importing and exporting the data.

Please not that this was done on my local dev machine at work and not done in a production environment, it wont cover replication as well as some other things to think about but its covers the basics.

I have RavenDB build 701 running from d:\ravedb-build\701 which runs on http://localhost:8080, I then added some test documents to the default database.

I noticed RavenDB had been updated to Build 888 and I began to think how do I get the data out of the old build version and into the new version, having a quick look I soon realised that I need to export data from the 701 build and then import that data into the 888 build.

Here is how I went about it:-

  1. I have RavenDB build 701 running from c:\ravendb\RavenDB-Build-701\ and had 50 documents within it – this runs from http://localhost:8080 as seen below:- Raven Build 701
  2. I then downloaded RavenDB build 888 and ran that from d:\RavenDB-Build-888\ which was empty – this runs from http://localhost:8082 as seen below:- Raven Build 888
  3. Now we can see the differences in the document database as below, Raven 701 build with documents:-
    701 Studio
  4. And the Raven 888 build with no documents as yet:-
    888 Studio
  5. To export and import data within RavenDB you use a tool called smuggler, smuggler can be found within the Smuggler folder and the exe is called Raven.Smuggler.exe
  6. To export the data from RavenDB Build 700 I went into a command prompt window moved into the location of the smuggler exe and ran the following command -> Raven.Smuggler out http://localhost:8080 dump.raven
    Dump of 701
  7. Ok great, now we have exported our data, time to import it into the newer 888 build of RavenDB, to do this we need to a couple of things, firstly locate the dump.raven file in the 701 build/smuggler folder as below:-

    701 dump file location

    And then copy it to somewhere for importing, to make it easy I just copied it to the smuggler folder within the build 888 as below:-

    888 dump file location

    Then go to the smuggler folder for this build and then use the following command -> Raven.Smuggler in http://localhost:8082 dump.raven

  8. We will see Raven ha imported our documents for us:- Data Imported
  9. Lastly lets check in the new build 888 that our documents are there:-
    Documents Imported

And there we go we have moved out documetns from the 701 build to the 888 build, if yo do this you will notice that the index definitions are copied there but havent been built, i.e. youll need to rubuild them manually.

Please feel free to leave a comment if you find this useful or have any questions.


Accessing RavenDB Studio when using Embedded Mode

I have seen a few people ask how to go about accessing the RavenDB studio when they use RavenDB in embedded mode, normally you would tend to use embedded mode when unit testing.

In the following article I show you how to get the RavenDB Management Studio working in an MVC 3 application.

  1. File, New, MVC 3 Application as below:- EmbeddedMode
  2. Choose whatever you prefer in the next window, I chose Internet Application:- EmbeddedMode
  3. Now using Nuget add in the RavenDB Embedded package:- EmbeddedMode
  4. Now we need to add in some details for the application to talk to RavenDB, lets do that now, so edit the global.asax.cs file to have the following code:- [sourcecode language=”csharp”] public static IDocumentStore Store { get; set; }

    public static void RegisterGlobalFilters(GlobalFilterCollection filters)
    {
    filters.Add(new HandleErrorAttribute());
    }

    public static void RegisterRoutes(RouteCollection routes)
    {
    routes.IgnoreRoute("{resource}.axd/{*pathInfo}");

    routes.MapRoute(
    "Default", // Route name
    "{controller}/{action}/{id}", // URL with parameters
    new { controller = "Home", action = "Index", id = UrlParameter.Optional } // Parameter defaults
    );
    }

    protected void Application_Start()
    {
    AreaRegistration.RegisterAllAreas();
    RegisterGlobalFilters(GlobalFilters.Filters);
    RegisterRoutes(RouteTable.Routes);

    Store = new EmbeddableDocumentStore {
    DataDirectory = "Data",
    UseEmbeddedHttpServer = true
    };
    Store.Initialize();
    }
    [/sourcecode]

  5. Now in order to be able to view the RavenDB Management Studio we need to locate the file Raven.Studio.xap from the packages folder which was created when we added in the Nuget package above.

    The packages folder is located in the directory above the folder in which your solution currently resides, once you locate the packages folder locate the RavenDB-Embedded(version number) folder in my case this is RavenDB-Embedded.1.0.701 – the file we are looking for is in the packages\RavenDB-Embedded.1.0.701\lib\net40\

    Copy the Raven.Studio.xap to the root of your website and now try running your MVC website.

  6. Once that loads up now browse to http://localhost:8080 and the RavenDB Studio should load up – and that’s you.
  7. If you see this:- EmbeddedMode

    It means you havent copied the Raven.Studio.xap to the root of your website.

I hope this helps someone out.


Profiling your RavenDB MVC application

Your application is starting to take shape and you want to be able to quickly see what’s going on when using RavenDB.

Step forward the in-built profiling dll which is very easy to set up and get going with, lets implement that along with MiniProfiler.

  1. Add the Nuget package MiniProfiler.RavenDb to your application
  2. Add the Raven.Client.MvcIntegration dll which can be found in the Client folder when you download the source for RavenDB
  3. Add the following to your global.asa.cs file:-
    [sourcecode language=”csharp”] protected void Application_BeginRequest()
    {
    if (Request.IsLocal)
    {
    MiniProfiler.Start();
    }
    }
    [/sourcecode]

    and then :-

    [sourcecode language=”csharp”] protected void Application_EndRequest()
    {
    MiniProfiler.Stop();
    }
    [/sourcecode]
  4. Add the following to your global.asa.cs file in the Application_Start event:- [sourcecode language=”csharp”] Raven.Client.MvcIntegration.RavenProfiler.InitializeFor(Store);
    MvcMiniProfiler.RavenDb.Profiler.AttachTo((DocumentStore)Store);
    [/sourcecode]
  5. Lastly add the following lines into your _Layout.cshtml file in the Shared folder, under Views:- [sourcecode language=”csharp”] @MvcMiniProfiler.MiniProfiler.RenderIncludes()
    @Raven.Client.MvcIntegration.RavenProfiler.CurrentRequestSessions()
    [/sourcecode]

That’s it – you have now adedd the built in profiler and MiniProfiler for RavenDB, run your application and you can
see that in the top left hand corner you can view the details of whats going on in both profilers:-

MiniProfiler for RavenDB looks like this:-

MiniProfiler

and this:-

MiniProfiler 2

while with the RavenDB profiler we see something like this:-

RavenDB Profiler

The in-built profiler from RavenDB shows us how long the query took, the status, result, Method, Url, Query and Actions as well as the actual request details.

All in all both profilers are very hand and very easy to install – go get them installed.


RavenDB Hints and Tips

RavenDB Here is a list of hints and tips if you’re looking for some help with RavenDB.


  • Sign up for the mailing list where you can see other people’s previous questions and answers to problems on the View the Google Group.
  • To make sure RavenDB doesn’t clash with routing used in MVC change the global.asa.cs file from:-

    {controller}/{action}/{id} to {controller}/{action}/{*id} – Note the * next to the {id} or you can do this.

  • If I choose the Embedded version of RavenDB how do I start the server – to start the RavenDB server locate the RavenDB folder and then look for the server folder and then run Raven.Server.Exe
  • If I install RavenDB using Nuget then what do I do, locate the packages folder which is in the folder one above the solution you’ve added it to on the file system, locate the RavenDB folder and then look for the server folder and then run Raven.Server.Exe
  • How do you view the RavenDB Studio – easiest way is to browse to http://localhost:8080, that’s the default location of installation when you first run the Raven.Server.Exe
  • Unit testing – how best to go about it – the recommended way to go about this is by using the EmbeddedDocumentStore
    which is basically all done in memory, you can set it up like this:-

    [sourcecode language=”csharp”] var documentStore = new EmbeddableDocumentStore
    {
    DataDirectory = "Data",
    RunInMemory = true,
    UseEmbeddedHttpServer = true
    };
    [/sourcecode]
  • Good RavenDB Samples RavenOverFlow and Racoon Blog

If your stuck with something give me a shout I’ll see if I can shed some light, I’ll be adding more tips as I learn more RavenDB.


Host your RavendDB based MVC app on Appharbor

RavenDBIn this blog post I will walk through how to host an MVC application which uses RavenDB as the back-end document database hosted up on Appharbor, Appharbor now allows us to host RavenDB in the cloud.

In the blog post I am going to make several assumptions, the post itself is more to do with getting an application deployed and running up on AppHarbor using RavenDB as the document database.

I am assuming you have you have a github account and know how to get your code up onto github, an Appharbor account and know how to deploy your code to github to Appharbor.

If you need some help with doing this then check here.

Ok lets create a brand new MVC Web application project, I used MVC 3 application

Raven2

And then I chose the internet template.

Raven3

You can either download RavenDB from RavenDB.net or use Nuget to get RavenDB. For the demo I just installed it using Nuget
as follows, within Visual Studio goto Tools, Library Package Manager and then select Package Manager Console and then type:-

Raven

RavenDB is now downloaded using NuGet and you will find it within the packages folder in the same location on disk as your project solution files, to start RavenDB locat the packages folder and then go to the RavenDB.1.0.616 folder and then the Server folder and double click on Raven.Server.exe as below:-

Raven4

By default RavenDb runs on http://localhost:8080, once started you can view the Raven Studio from within a browser, and you should see something like this:- (if it says Create Sample Data then click on the button to create sample data)

Raven10

Moving back to our MVC Application we now need to wire a couple of things up to use RavenDB as below:-

In the global.asax add in the following in the Application_Start event:-

[sourcecode language=”csharp”] protected void Application_Start()
{
AreaRegistration.RegisterAllAreas();

RegisterGlobalFilters(GlobalFilters.Filters);
RegisterRoutes(RouteTable.Routes);

var parser = ConnectionStringParser<RavenConnectionStringOptions>.FromConnectionStringName("RavenDB");
parser.Parse();

Store = new DocumentStore
{
ApiKey = parser.ConnectionStringOptions.ApiKey,
Url = parser.ConnectionStringOptions.Url,
}.Initialize();
}
[/sourcecode]

Add in a connection string in your web.config as follows:-

[sourcecode language=”csharp”] <connectionStrings>
<add name="RavenDB" connectionString="Url=http://localhost:8080" />
</connectionStrings>
[/sourcecode]

All new Controllers will inherit from RavenController which is below:-

[sourcecode language=”csharp”] public class RavenController : Controller
{
public IDocumentSession RavenSession { get; private set; }

protected override void OnActionExecuting(ActionExecutingContext filterContext)
{
if (filterContext.IsChildAction)
return;
RavenSession = MvcApplication.Store.OpenSession();
base.OnActionExecuting(filterContext);
}

protected override void OnActionExecuted(ActionExecutedContext filterContext)
{
if (filterContext.IsChildAction)
return;
using (RavenSession)
{
if (filterContext.Exception != null)
return;

if (RavenSession != null)
RavenSession.SaveChanges();
}
}
}
[/sourcecode]

Below is some example code for some basic CRUD.

[sourcecode language=”csharp”] public class AlbumController : RavenController
{
public ActionResult Index()
{
var model = this.RavenSession.Query<Album>().ToList();
return View(model);
}

public ActionResult Create()
{
var model = new Category();
return View(model);
}

[HttpPost] public ActionResult Create(Album album)
{
this.RavenSession.Store(album);
return RedirectToAction("Index");
}

public ActionResult Edit(string id)
{
var model = this.RavenSession.Load<Album>(id);
return View(model);
}

[HttpPost] public ActionResult Edit(Album album)
{
this.RavenSession.Store(album);
return RedirectToAction("Index");
}

public ViewResult Details(string id)
{
var model = this.RavenSession.Load<Album>(id);
return View(model);
}

public ActionResult Delete(string id)
{
var model = this.RavenSession.Load<Album>(id);
return View(model);
}

[HttpPost, ActionName("Delete")] public ActionResult DeleteConfirmed(string id)
{
this.RavenSession.Advanced.DatabaseCommands.Delete(id, null);
return RedirectToAction("Index");
}
}
[/sourcecode]

Within Appharbor choose RavenDB as an add-on, appharbor will provision you with a connection string if you choose
RavenDB as an add-on, wait a couple of seconds and you will be supplied with a connection string for your RavenDB instance in the cloud.

Step 1

Step1

Step 2

Step 2

Step 3

Step 3

Step 4
Step 4

Step 5
Step 5

This setting is the one you will change to within your web.config, for testing locally use http://localhost:8080 but for deploying to the cloud use the connection string setting supplied to us by Appharbor.

Getting RavenDB from NuGet means quite a large download, we dont want to have to upload all of this content to github so we can do a nice little thign within our solution, roght click on the entire solution within Visual Studio and choose:-

Package Restore

This means our github repository doesnt have to contain all of the Nuget packages and will pull them down for us when building.

Once your code is building and running locally send it up to github and use the service hook to deploy to Appharbor.

If you come across any build errors then you may have to turn customerrors=”Off” in your web.config as well as checking the build log on Appharbor to see what went wrong.

At this point we should have a working MVC application which is using RavenDB as the back-end document database – sweet.

If I missed anything or anyone has any questions or comments please tweet me @gsuttie or leave a comment.


RavenDB Useful Tools

Here I will list all of the useful tools I come across when using RavenDB.

So here is the list:-

  • RavenDB add on for Glimpse Glimpse RavenDB.
  • RavenDB Mini Profiler – more info can be found here and here.
  • LinqPad which can be found here is a great tool which you can use to query RavenDB using Linq statements – if you have the correct third party driver installed.

    To learn how to get Linqpad to query RavenDB you will find all you need to do here.

  • Rest-Client which can be found here is extremely handy for testing Restful webservices which RavenDB is.

    RestClient

    Click the downloads tab and then select the following:-

    RestClient

    Once selected rest-client will fire up, it’s very straight forward to use, put in the url to your database where RavenDB is running and then you can use the POST, GET and so on as below:-

    RestClient3

  • Fiddler 2 which can be found here

    Fiddler is a Web Debugging Proxy which logs all HTTP(S) traffic between your computer and the Internet. Fiddler allows you to inspect traffic, set breakpoints, and “fiddle” with incoming or outgoing data. Fiddler includes a powerful event-based scripting subsystem, and can be extended using any .NET language

    We can use Fiddler to monitor what is going on when we work with RavenDB as well as use it to inject documents on the fly which is shown in the Tekpub video series.

  • If anyone has any other useful tools for working with RavenDB then please let me know and I will add to this list.